ZSY-1
Electric digital display low temperature compliance tester
One,
ZSY-1
Electric digital display low temperature compliance tester
According to
GB/T328.14-2007
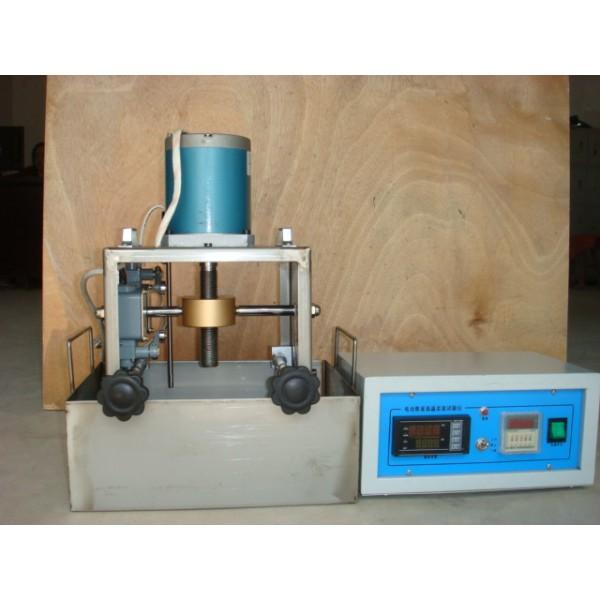
Design and manufacture. The electric digital display low temperature compliance tester is used to determine the minimum temperature at which the bitumen waterproofing membrane is bent without cracking under specified conditions. It consists of a low temperature compliance test mechanical part and a control instrument part.
The series low temperature compliance tester adopts a number of international advanced technologies. The input uses digital calibration and self-calibration technology. The measurement and control are accurate and stable, and the measurement error caused by temperature drift is eliminated. The instrument adopts multiple protection and isolation design, which has strong anti-interference performance and high reliability.
It works in freezing fluid or air. It is easy to use. The advantage of high intelligence makes it suitable for inspection units and coil production units. Ideal new standard products such as colleges and universities.
Three,
ZSY-1
Electric digital display low temperature compliance tester
Installation and commissioning
1. Put the sink into the low temperature box and add the frozen liquid. Any mixture of frozen liquids:
(1) Propylene glycol aqueous solution 1:1, as low as -25°C, or
(2) Ethanol/water mixture 2:1 below -20°C).
(3) Liquid level is 100mm. After the test piece has reached the specified temperature, it remains at that temperature for 1h ± 5min.
2. Connect the host and controller lines and turn on the power 220V with reliable grounding. Turn on the power switch and adjust the position of the bending axis through the falling and stopping buttons on the control panel. Place it at the bottom of the test piece, the size of the test piece is (150 ± 1) mm × (25 ± 1) mm. The distance between the two cylinders before starting all tests should be adjusted according to the thickness of the test piece, i.e., the diameter of the bending axis + 2mm + twice the thickness of the test piece. The device is then placed in the cooled liquid, and the upper end of the cylinder is below the surface of the frozen liquid by 10mm. The bending axis is in the lower position.
The diameter of the bending axis can vary depending on the product. Common sizes are 20mm, 30mm, 50mm.
3. After completing the above work, set the required temperature in the first step. The second step sets the time required. The third step is to turn the switch to the up position and place the main unit in the low temperature box. That is, when the desired temperature and time are reached, the bending axis automatically rises to complete one experiment.
Time setting: Set according to the constant temperature time required for material testing. That is, after reaching the set temperature, the test piece is lifted for a certain time delay.
4. Temperature setting: In the normal display state of SV/PV, click "SET" key to make SV display flashing. Press the “<†key to find the number of digits of the desired temperature. Press the up or down button to set the desired temperature. After the setting is completed, press “SET†again to return to the normal SV/PV display status.
5. Clear key use: When the set temperature and time are reached, the bending axis lifts up at a speed of 360mm/min, starting the test. One test is completed, press the down button to return, and press the clear button to wait for the next test.
6. After the set temperature is reached, the bending rod is automatically tested to complete the bending process within 10 seconds. Under the appropriate light source, the test piece is visually inspected for cracks. If necessary, an auxiliary optical device may be used. If one or more cracks penetrate from the coating layer to the carcass layer, or completely through the unreinforced coil, there is a crack. Five test pieces should be tested separately. If the device size allows, several sets of test pieces can be tested simultaneously.
The range of cold bend temperature (unknown) is initially determined. Start from the desired cold bend temperature, test each test piece every 6°C. Each test temperature is a multiple of 6°C (e.g., -12°C, -18°C, -24°C, etc.). Starting from the lowest temperature that causes damage, test every 2°C on both the upper and lower surfaces of each group of five test pieces. Each time, change the temperature by 2°C until each group of 5 test specimens has at least 4 without cracks. This temperature is recorded as the cold bending temperature of the test piece.
4. After the test is finished, clean the surface and apply anti-rust grease to cover the dust cover for the next use.
Vapes For Smoking,Air-Cooled Cooling E-Cigarette,Modern E-Cigarette,Variable Voltage E-Cigarette
Shenzhen Ousida Technology Co., Ltd , https://en.osdvape.com