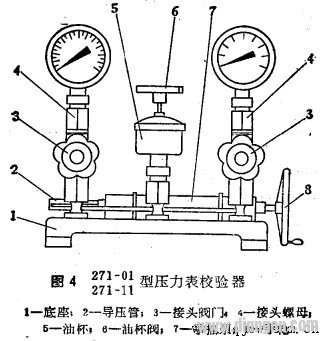
1. Place the pressure gauge checker smoothly on the workbench and ensure it is in a stable position. For models like 271-01 and 27-11 (as shown in Figure 4), arrange them horizontally or vertically as needed, making sure the handwheel is easy to turn and the pressure gauge dial is facing the operator for better visibility. The standard meter should be installed on the left or rear joint of the checker to facilitate inspection and operation.
2. Fill the oil cup with a medium to a depth of at least two-thirds. Open the oil cup valve and close the joint valve, then turn the handwheel to screw out the oil pump screw and draw in the oil. The speed of turning the handwheel should be smooth, and the wire length should not reach the end. After the oil has been drawn in, stop briefly. Once fully filled, screw the screw back in a few turns to release any air that was drawn in, then close the oil cup valve and open both joint valves. At this point, you can adjust the handwheel to transfer the medium and achieve either an increase or decrease in pressure, completing the calibration process efficiently.
3. After the calibration is done, turn the handwheel down to near the zero position, open the oil cup valve, and completely release any remaining pressure so that the pointer accurately returns to zero. Re-oil by shaking the handwheel again in the original order. Then close the oil cup valve and repeat the verification process using the same method for consistency and accuracy.
This procedure ensures that the pressure gauge is tested thoroughly, maintaining its reliability and precision for future use. Proper handling and careful adjustment are essential to avoid errors and ensure accurate readings during each calibration session.
Panoramic Elevator,Full View Scenic Passenger Elevator,View Elevator,Outdoor Panoramic Glass Elevator
ZHONG HAN INTERNATIONAL TRADE CO., LTD , https://www.cck-ht.com