Analysis of the construction steps of making an image recognition tool with TensorFlow
Editor's Note: Sara Robinson shared an intriguing project on Medium where she developed an app capable of automatically recognizing Taylor Swift. This approach is quite similar to the Weili project we previously introduced. The tutorial is very detailed, and students interested in building their own image recognition tools are encouraged to follow along. This article has been authorized by the author, and the following is a compilation of the original text.
Note: At the time of writing this article, TensorFlow did not have a Swift library, so I used Swift to create an iOS app that sends prediction requests to my trained model.
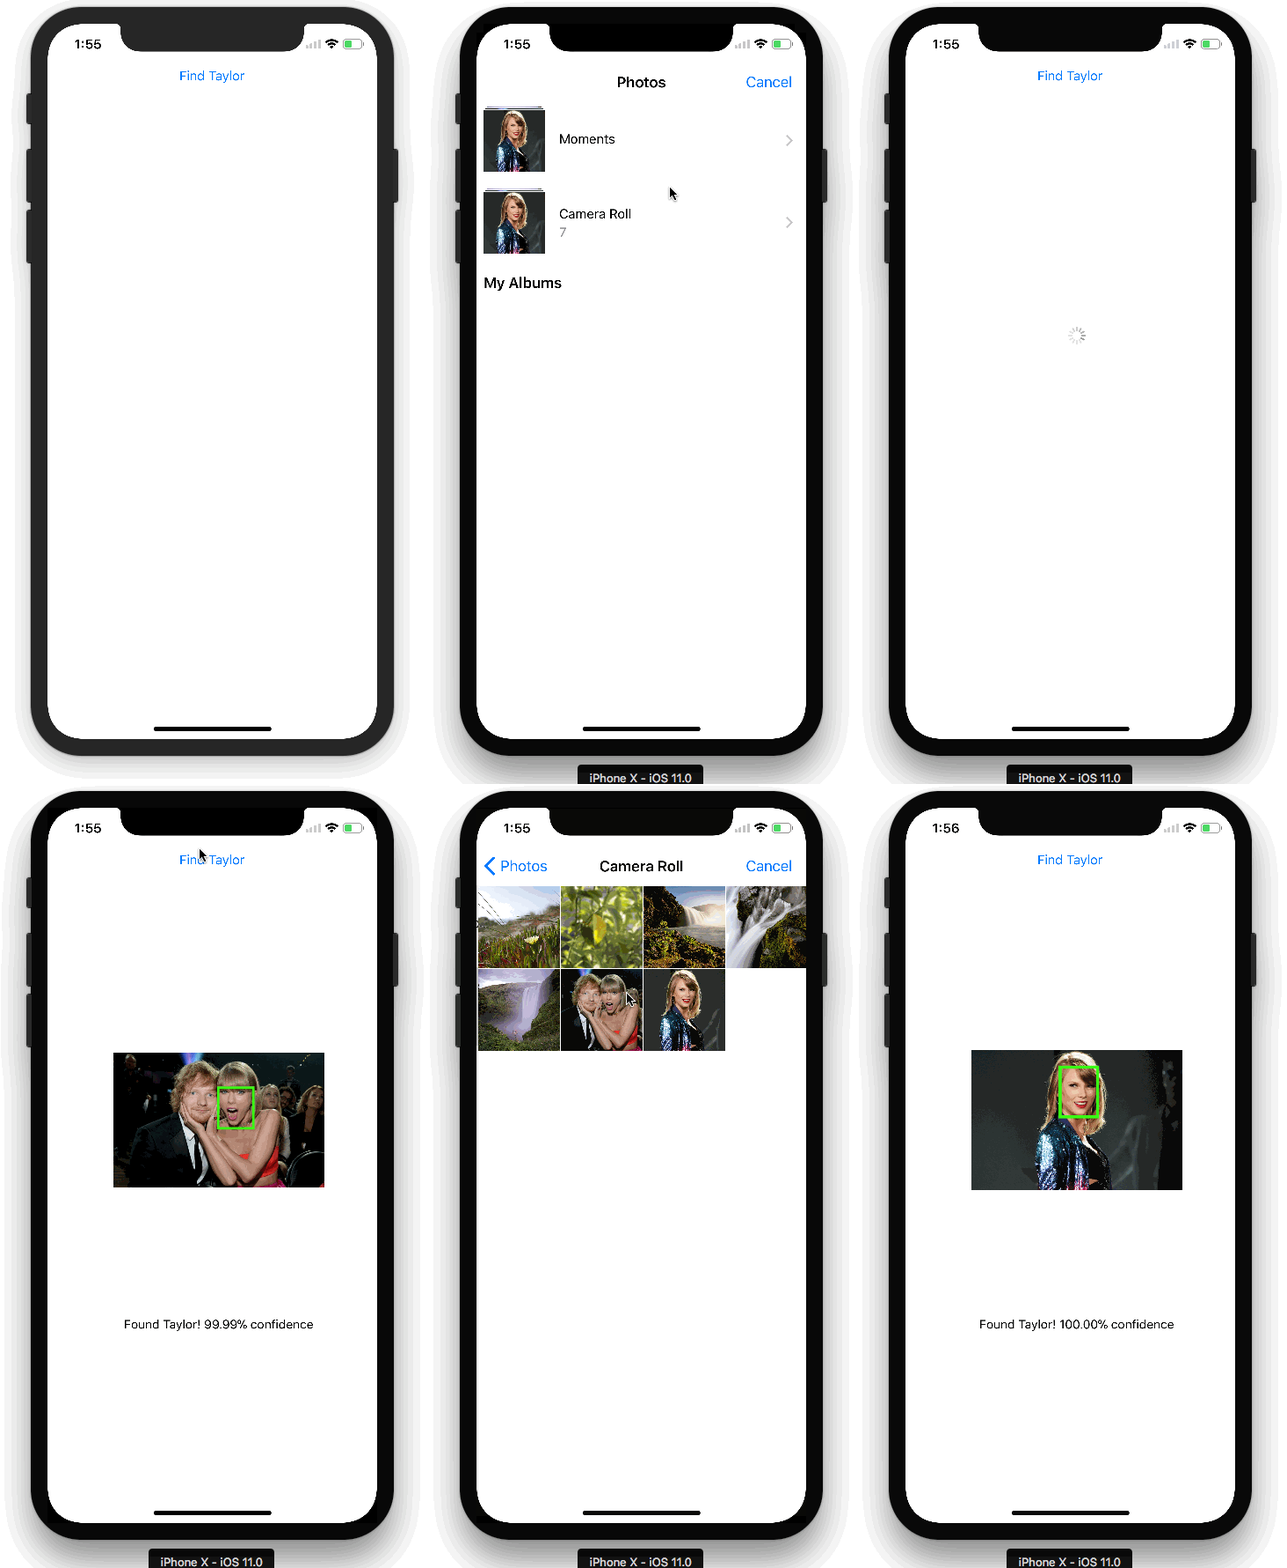
Here is the app we created:

The TensorFlow Object Detection API allows you to identify the location of specific objects within an image, which can be applied to various interesting applications. Since I often take photos of people, I wanted to apply this technology to face recognition. It turned out that the model performed quite well! This is the Taylor Swift detector I created above.
This article will walk you through the steps of building the model, from collecting images of Taylor Swift to training the model:
- Preprocess the images: resize, label, and split them into training and testing sets, then convert them into Pascal VOC format.
- Convert the images into TFRecords files to comply with the object detection API.
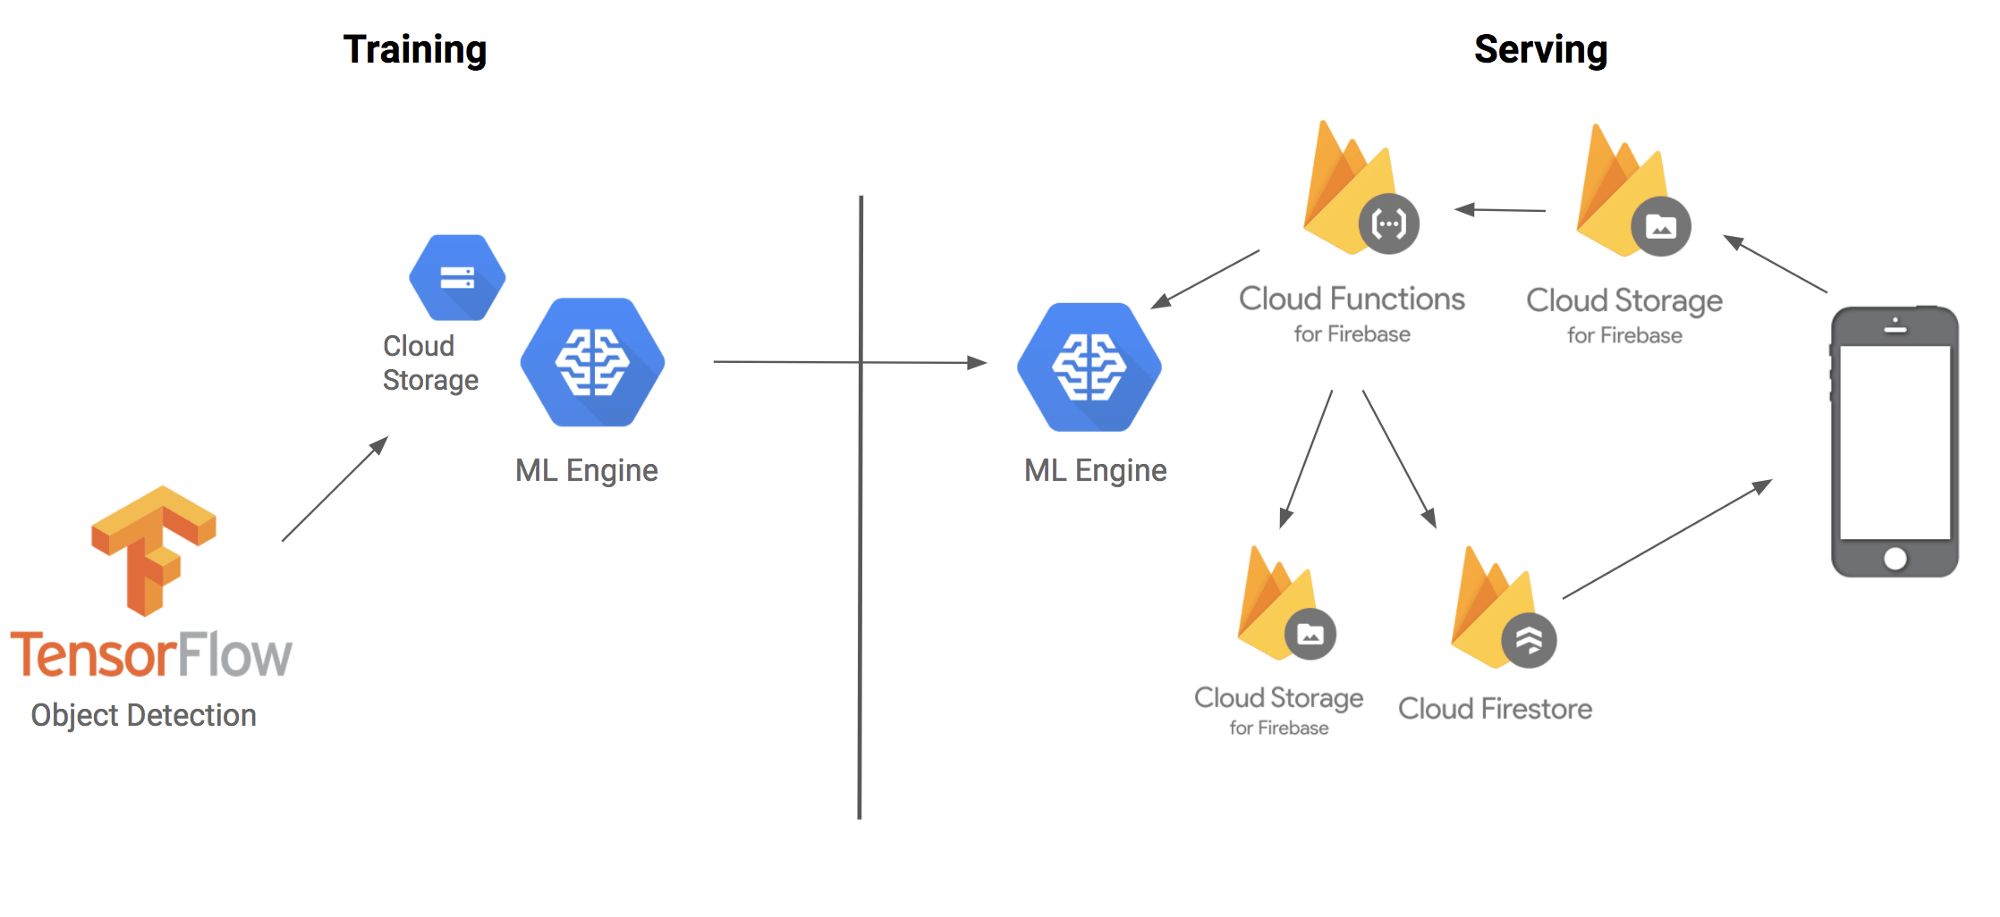
- Use MobileNet to train the model on Google Cloud ML Engine.
- Export the trained model and deploy it to the ML Engine for serving predictions.
- Build an iOS front-end and make prediction requests using the trained model (written in Swift).
Here’s an architectural diagram showing how the different components fit together:

Before we begin, let’s briefly explain the techniques and terminology involved. The TensorFlow Object Detection API is a framework built on top of TensorFlow that identifies specific objects in an image. For example, you can train it using many cat images. Once the training is complete, you can input a new image, and it will output a list of bounding boxes indicating where the cat is located. While it’s called an API, think of it more as a convenient tool for deploying models.
However, training a model to detect objects in images is time-consuming and labor-intensive. One of the most powerful features of object detection is transfer learning, which allows you to use pre-trained models. Transfer learning works like this: when children learn their first language, they’re exposed to many examples, and corrections are made immediately. For instance, when learning to recognize cats, parents point to a cat in a picture and say the word "cat," reinforcing the brain’s connections. When learning to recognize dogs, there’s no need to start from scratch—this is how transfer learning works.
But instead of spending time labeling thousands of Taylor Swift images, I used transfer learning by modifying the last few layers of a model already trained on millions of images.
Step 1: Preprocessing the Images
Thanks to Dat Tran’s blog on the Raccoon Detector, I was able to follow a similar process. I downloaded 200 images of Taylor Swift from Google Images using a Chrome plugin called Fatkun Batch Download Image. Before labeling, I divided the images into training and testing sets. I also wrote a script to resize the images (available at [https://github.com/sararob/tswift-detection/blob/master/resize.py](https://github.com/sararob/tswift-detection/blob/master/resize.py)) to ensure each image’s width didn’t exceed 600px.
Since the detector needs to locate objects in an image, I couldn’t just use raw images and labels. I needed to draw bounding boxes around the objects and assign labels (in our case, only one label: "tswift").
For this, I used LabelImg, a Python-based tool. After labeling, it generates XML files containing the bounding box coordinates for each image. Here’s an example of what the XML file looks like:
```xml
DesktopTswift.jpg/Desktop/tswift.jpgUnknown100066730
```
Now that I had labeled images, I needed to convert them into a format TensorFlow accepts: TFRecords. You can find the conversion script on GitHub. To run it, download the `tensorflow/models` repository and execute the script from `tensorflow/models/research` with the following parameters (run it twice: once for training data and once for test data):
```bash
python convert_labels_to_tfrecords.py \
--output_path=train.record \
--images_dir=path/to/your/training/images/ \
--labels_dir=path/to/training/label/xml/
```
Step 2: Training the Detector
Training the model on a laptop would take too long and consume too many resources. So, I decided to use the cloud. Google Cloud ML Engine allows me to run multiple training jobs efficiently and complete the work in a few hours.
Setting up the Cloud ML Engine
I created a project in the Google Cloud Console and enabled the Cloud ML Engine. Then, I created a storage bucket to hold all the model resources. Make sure to store everything in the same region (don't select multiple regions).
Next, I uploaded the training and test TFRecord files into the `/data` subdirectory of the bucket.
The object detection API also requires a `pbtxt` file that maps labels to integer IDs. Since we only have one label, it's simple:
```text
Item {
id: 1
name: 'tswift'
}
```
Adding MobileNet Checkpoints for Transfer Learning
To avoid training from scratch, I used a pre-trained MobileNet model. MobileNet is a lightweight model optimized for mobile devices. I downloaded the checkpoint and placed it in the same directory in the cloud bucket.
I also created a configuration file that tells the training script where to find the checkpoints, label mappings, and training data. This file includes hyperparameters such as convolution size, activation functions, and training steps.
Once everything was set up, I started the training job using the `gcloud` command. I also initiated an evaluation job to assess the model's accuracy on unseen data.
Step 3: Deploying the Model
After training, I converted the model checkpoint into a Protobuf file. Using the `export_inference_graph.py` script, I exported the model and uploaded the `saved_model.pb` file to the cloud storage.
Then, I deployed the model to the ML Engine using the `gcloud` command.
Step 4: Building a Predictive Client with Swift and Firebase
Finally, I developed an iOS client in Swift that uploads images to cloud storage, triggers a Firebase function, and makes prediction requests to the ML Engine. The results are saved back to the cloud and displayed in the app.
All right! Now we have a working Taylor Swift detector. Keep in mind that since the model was trained on only 140 images, its accuracy isn't perfect and may sometimes misidentify others as Taylor. However, if I collect more images and retrain the model, I plan to publish it to the App Store.